Tag Archives: crochet pattern

Big crochet update!

Hello everyone!

It feels so strange to be sitting at my computer and to finally open a new blog post that isn’t a hand quilt along update (!!). In the last year, with the birth of baby Clark, my life kind of has been turned upside down and I have suddenly found myself with no energy or will to blog. I also stopped crocheting for a while, which is very strange because crochet has been my favourite fibre art media for years now (in fact, since I learnt how to in 2011). I haven’t blogged anything about my crochet since March (where did time go?) but in the last couple of months I’ve actually been back at it full force and I am very excited to share with you what I have been up to!

  1. I have started designing again and I have made quite a few new little critters!

    From left to right, top row: Lara the love bug, Nate the narwhal, Daisy the duckling
    From left to right, bottom row: Little fish, scientist set, Unnamed caterpillar

  2. The patterns for Lara and Nate have been released! You can find Lara on my Ravelry store and Nate for free (which leads me to point number 3!)
  3. I have a new website where I am posting only my free patterns and links to my Ravelry patterns. I really wanted a space where I could have all my patterns in one place and I’m so happy with how it turned out!
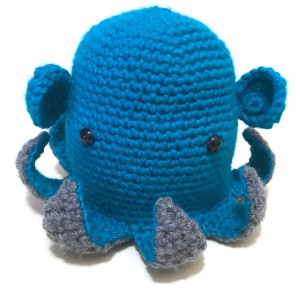
  4. I have participated in a very cute crochet along organised by LexInStitches (Alexa Templeton). The pattern is super cool and it is available here! Here is my finished puppy.
  5. If you have been following me for a while, you will know about my lord of the rings blanket (the blanket of shame I have been ‘working’ on for 4 years!). Well I have started the last square, and I have started joining it! Hooray!

That’s it for now, I think I will be back next week with some knitting update! I hope you have all been great and I will aim to catch up on some blog reading this week 🤞🏼

Emma

25 Comments

Filed under CAL, Crochet, soft toys

Cooper the Copepod pattern release

Happy Monday everyone!

Yes I’m still here, and baby is still in but I have exciting news! The pattern for Cooper the Copepod is finally live in my Ravelry store! I’ve had the pattern tested in August and my testers did a great job. If you read this Hannah, Lex and Heidi thanks again!

IMG_8457

I’m already working on my next pattern but it might get interrupted for a few months. Here is a sneak peak though, it will be a double pattern that you’ll be able to convert between a blue whale and a narwhal. I’m super excited about it!

IMG_8418

I hope you will all have a great week and if I suddenly disappear off you know where I’ll be 😉

Emma

11 Comments

Filed under Crochet, soft toys

Knitting afternoons and updating patterns

Hello lovely people!

I hope you’ve had a great weekend. I sure did! I actually went to a crafter noon at a local yarn store on Saturday (Little Woollie) and it was so much fun and really cool. I got to meet so many lovely ladies and the owner, Julie, spoilt us with chocolate eggs, raspberries and grapes as well as an endless supply of tea! How great? A lot of the ladies were making Julies newest amigurumi, a sweet little rabbit that she designed for a workshop and I met a left handed crocheter for the first time. It was just a really fun time!

On other news, I have been re-writting my pattern for Naiad the nudibranch and so I made a new one to take some more pictures (as the original was gifted to a friend when I first made it a couple of years ago).

IMG_7850 copy

Here it is, in brand new colours! I have seen a few issues with the pattern too so I will update it, add new pictures and upload the new free PDF on my Ravelry store as soon as I’m done 😀

Have you written a pattern before and then realise that there was a better way of laying it out? I’d love to hear your experience with that 🙂

screen-shot-2017-01-09-at-9-29-20-pm

16 Comments

Filed under Crochet, soft toys

Happy Halloween!!!

Happy Monday lovely readers!

I probably don’t need to remind you, but tomorrow is Halloween! You might have noticed but I absolutely adore Halloween 😊

I am all ready for trick and treaters tomorrow, I have set up my Halloween decorations and have lollies handy, including eye balls and vampire lollypops .

Here are my Halloween makes, they took me only around a week and they were super fun and cute to make. The good thing is that I will still have them next year! Aren’t they great?

To celebrate, I thought I would share a few Halloween posts that I’ve come across, with the patterns I’ve used and also a couple of Halloween recipes!

I hope the you all have an awesome Halloween tomorrow, that you eat too much lolly and that you get a good fright if that’s your thing!

screen-shot-2017-01-09-at-9-29-20-pm

22 Comments

Filed under Crochet, soft toys

FO Friday – Candice Doll (and free pattern for shorts)

Happy Friday my lovely readers!

Today I want to show you the newest addition to my amigurumi family: a cute little dolly!

This doll is quite special though as it represents one of my good friends. She asked me for that doll as well as another one of her girlfriend (who is also one of my close friends). The goal is to finish them by next week and send them to their new owners in France.

IMG_6756

I was very excited by that project as I think they will make very special gifts. I absolutely love how Candice turned out too! The pattern is from the very talented MaryJ Handmade/Le Arti Di Minerva on Ravelry. It’s a free pattern and there are no instruction for the assembly but if you are familiar with amigurumi it’s not too bad! I actually sew the head close and then added the body (worked continuously from the legs) and I didn’t stuff the arms.

IMG_6673

For the hair, I used a hair cap, following the same pattern as for the head but with a hook size above (from a 3.5 to a 4) and stopping after row 14.

I also had to make up the clothes as I went and I wrote the pattern for the shorts. I thought I would share it here with you guys if you want to make your own doll 😊

Abbreviations

  • ch – chain
  • sc – single crochet
  • sl st – slip stitch

Round 1 – Ch26, sl st in first ch

Rounds 2-6 – 26 sc around

Start on the first leg, you will work only with the next 13 stitches

Round 7-9 (leg 1) – 13 sc around

Fasten off and join yarn to the remaining 13 stitches

Round 7-9 (leg 2) – 13 sc around

Fasten off. Sew the tails in and you’re finished!

I hope you guys enjoyed the pattern, please tag me on instagram if you end up sharing your pictures @emmacraftsdesign

Have a great weekend!

screen-shot-2017-01-09-at-9-29-20-pm

17 Comments

Filed under Crochet, soft toys

Dumbo the Deep Sea octopus – free pattern

Happy Saturday readers!

I had planned to have this pattern up earlier than today but I just didn’t have time to finish my test amigurumi until this afternoon! Anyway, better late than never, here is the free pattern for my Dumbo octopus amigurumi.

If you want an easy to read PDF version, I have also put one for sale in my Ravelry store, which you can find here. I would also love to see your creations, so if you make Dumbo or any of my other amigurumi don’t forget to tag me @emmacraftsdesign on Instagram, and #dumbotheoctopus for this little guy!

IMG_6416


Materials
• DK or 8ply yarn in two different colours (Main Colour for the body and Contrast Colour for the belly)
• 3.75 (F) crochet hook or appropriate hook for the weight of yarn chosen
• Tapestry needle and scissors
• Polyfill

Optional: 2x 7.5mm safety eyes (not meant for children under 3 y.o.)

Abbreviation used (U.S. terms)
Ch: chain Sc: single crochet St: stitch *…*: repeat sl st: slip stitch
Hdc: half double crochet Dc: double crochet
sc2 tog: single crochet 2 stitches together (invisible decrease)

Body – make 1

In main colour
Round 1. sc 6 in magic ring
Round 2. 2sc in each st around
Round 3. *sc 1, 2sc in the next st* around
Round 4. *sc 2, 2sc in the next st* around
Round 5. *sc 3, 2sc in the next st* around
Round 6. *sc 4, 2sc in the next st* around
Round 7. *sc 5, 2sc in the next st* around
Rounds 8-14. sc in each st around
Round 15. *sc 6, 2sc in the next st* around
Rounds 16-27. sc in each st around
Round 28. *sc 4, sc2tog* around
Place the safety eyes (or embroider them)
now, between rounds 17 and 18

We are now starting the body tentacles (top of the tentacles). The first tentacle will be made in the continuity of the body, without breaking the yarn. For all other tentacles (7 of them) the yarn will be joined to the body in the next st after the previous tentacle, and the tentacles instructions repeated.

Body Tentacles – Make 8

In main colour, continuing from the body
Rows 1-5. sc 5, turn (do not chain when you turn, or your edges will be wonky!)
Row 6. sc 1, sc2tog, sc2, turn
Rows 7-8. sc 4, turn
Row 9. sc 1, sc2tog, sc1, turn
Row 10. sc 1, sc2tog, turn
Row 11. sc2tog, turn
Row 12-13. sc 1, turn

Fasten off. Join your yarn on the body edge, in the next stitch and repeat the instructions until you have 8 tentacles.

Belly – Make 1

In contrast colour
Round 1. sc 8 in magic ring
Round 2. 2sc in each st around
Round 3. *sc 1, 2sc in the next st* around
Round 4. *sc 2, 2sc in the next st* around
Round 5. *sc 3, 2sc in the next st* around
Round 6. *sc 4, 2sc in the next st* around
Round 7. *sc 5, 2sc in the next st* around

We are now starting the belly tentacles (bottom of the tentacles). They will be worked the same way as the body tentacles but joining back to the belly instead.

Belly Tentacles – Make 8

In contrast colour, continuing from the belly
Rows 1-2. sc 7, turn (do not chain when
you turn, or your edges will be wonky!)
Row 3. sc 2, sc2tog, sc 3, turn
Row 4. sc 6, turn
Row 5. sc 2, sc2tog, sc 2, turn
Rows 6-9. sc 5, turn
Row 10. sc 1, sc2tog, sc2, turn
Rows 11-12. sc 4, turn
Row 12. sc 1, sc2tog, sc1, turn
Row 14. sc 1, sc2tog, turn
Row 15. sc2tog, turn
Row 16-17. sc 1, turn

Fasten off. Join your yarn on the belly edge, in the next stitch and repeat the instructions until you have 8 tentacles.

Ears/ fins – Make 2

Round 1. sc 6 in magic ring
Round 2. sc 2, *2 sc in next st* twice, sc 2
Round 3. sl st, sc 1, 2 hdc in next st, *2 dc in next st* twice, 2 hdc in next st, sc 1, sl st
Round 4. sl st, sc 3, *2 sc in next st* 4 times, sc 3, sl st

Fasten off leaving a long tail to sew on the body.

Assembly

1. Sew the ears on the body facing forward, roughly between rounds 13 and 16.
2. Weave in all the yarn tails at the tips of the body and belly tentacles.
3. Stuff the body to desired firmness and sew the belly on using a whip stitch, making sure to align the tips of the tentacles together. Make sure that there is no polyfill in your tentacles or they will be too bulky. Note that the base of the tentacles do not align.

If you have any question about the instructions, you can just leave me a comment 🙂 I hope you guys are having a great weekend!

screen-shot-2017-01-09-at-9-29-20-pm

18 Comments

Filed under Crochet, soft toys

WIP Wednesday – Gandalf’s pipe and madeleines

Happy Wednesday readers!

I have taken back to my LOTR crochet along now that my ripple blanket is almost done (2 rows left, yay!). I have made a start on Gandalf’s pipe, and here is what it looks like so far.

IMG_6094

I’ve also been baking today, I made a fresh batch of madeleines using my nana’s recipe and they were delicious!

It was actually quite funny because I was using fresh eggs that a friend brought over and the madeleines turned out so bright compared to usual! I even though something was wrong before I realised what was happening 😂

If you are interested with the recipe, I’ll post it next week, just let me know in the comments 😊

screen-shot-2017-01-09-at-9-29-20-pm

6 Comments

Filed under CAL, Crochet, miscellaneous, WIP, Work in progress

Snail amigurumi pattern

Happy Monday crafters!

I have finally found the time to write up my snail amigurumi pattern, I still need to finalise the PDF but here is the free pattern for you to use! Once I finish it, the PDF will be available for AU$2 on my Ravelry and Etsy stores 🙂

My little snail has also been finally named, and after my best friend, which is fitting because he is French: Arno the escargot!

Now, without further ado, the pattern for this cute little guy.

img_5741

Materials

  • DK or 8ply yarn in two different colours (Main Colour for the body and Contrast Colour for the shell)
  • 3.75 (F) crochet hook
  • Tapestry needle and scissors
  • Polyfill

Optional: 2x 7.5mm safety eyes (not meant for children under 3 y.o.)


Abbreviation used

Ch: chain         Sc: single crochet        St: stitch          *…*: repeat

sc2 tog: single crochet 2 stitches together (invisible decrease)

All pieces are worked through both loops of the stitches and the body is worked in the round without joining

img_5733

Body – make 1

In main colour

Round 1. sc 6 in magic ring

Round 2. 2sc in each st around

Round 3. *2sc in the next st, sc 1* around

Rounds 4-6. sc in each st around

Round 7. ch 5, sl st 4 from second st from

hook, sc 6, ch 5, sl st 4 from second

st from hook, sc 12 (antennae)

Add the safety eyes in front of the antennae

Round 8-12. sc in each st around

Round 13. *sc2 tog, sc 1* around

Rounds 14-17. sc in each st around

Round 18. *sc2 tog* around

Round 19-20. sc in each st around

Round 21. *sc2 tog* around

Stuff to desired firmness

Cast off and sew shut

img_5734

Shell – make 1

In contrast colour

Ch 2

Row 1. 2sc from second st from hook, ch 1, turn

Row 2. 2sc in the next st, sc 1, ch 1, turn

Row 3. sc 3, ch 1, turn

Row 4. sc 1, 2sc in the next st, sc 1, ch 1, turn

Row 5. sc 4, ch 1, turn

Row 6. sc 1, 2sc in the next st, sc 2, ch 1, turn

Row 7. sc 5, ch 1, turn

Row 8. sc 2, 2sc in the next st, sc 2, ch 1, turn

Row 9. sc 6, ch 1, turn

Row 10. sc 2, 2sc in the next st, sc 3, ch 1, turn

Row 11. sc 7, ch 1, turn

Row 12. sc 3, 2sc in the next st, sc 3, ch 1, turn

Row 13. sc 8, ch 1, turn

Row 14. sc 3, 2sc in the next st, sc 4, ch 1, turn

Row 15. sc 9, ch 1, turn

Row 16. sc 4, 2sc in the next st, sc 4, ch 1, turn

Row 17. sc 10, ch 1, turn

Row 18. sc 4, 2sc in the next st, sc 5, ch 1, turn

Row 19. sc 11, ch 1, turn

Row 20. sc 5, 2sc in the next st, sc 5, ch 1, turn

Row 21. sc 12, ch 1, turn

Row 22. sc 5, 2sc in the next st, sc 6, ch 1, turn

Row 23. sc 13, ch 1, turn

Row 24. sc 6, 2sc in the next st, sc 6, ch 1, turn

Row 25. sc 14, ch 1, turn

Row 26. sc 6, 2sc in the next st, sc 7, ch 1, turn

Row 27. sc 15, ch 1, turn

Row 28. sc 7, 2sc in the next st, sc 7, ch 1, turn

Row 29. sc 16, ch 1, turn

Row 30. sc 7, 2sc in the next st, sc 8, ch 1, turn

Row 31. sc 17, ch 1, turn

Row 32. sc 8, 2sc in the next st, sc 8, ch 1, turn

Row 33. sc 18, ch 1, turn

Row 34. sc 8, 2sc in the next st, sc 9, ch 1, turn

Row 35. sc 19, ch 1, turn

Row 36. sc 9, 2sc in the next st, sc 9, ch 1, turn

Row 37. sc 20, ch 1, turn

Cast off leaving a very long tail

Sew the shell along the long side of the triangle

to obtain a cone, still leaving a long tail


Assembly

  1. Stuff the shell loosely and sew the cone on itself to make a spiral
  2. Sew the shell to the top of the snail body


I hope that you guys enjoy this pattern, if you make it I’d love to see your snail. You can tag #emmacraftprojects on Instagram as well so that I can find your creations more easily 🙂

Have a great week!

screen-shot-2017-01-09-at-9-29-20-pm


14 Comments

Filed under Crochet, soft toys

LOTR CAL – Gandalf the Grey

Happy Friday!

I have finished yet another square on my LOTR graphghan CAL. Gandalf the Grey is ready to save Middle Earth. You can find all my LOTR related posts by clicking on the LOTR CAL tab at the top of my blog or by following this link.

I still have 6 squares to go, and I’d really like to get finished by May to enter the finished blanket in a craft show! Better get hooking faster!

IMG_5761

Have a great weekend!

screen-shot-2017-01-09-at-9-29-20-pm

6 Comments

Filed under CAL, Crochet

Millie the Manta Ray

Happy Monday crafters!

Today I’d like to share my latest amigurumi with you, Millie the Manta Ray. I have named it after one of my friends who works on the Project Manta.

I’ll post the pattern here for free but if you want to get a shiny PDF pattern with extra pictures, I’ll also put it for sale on my Ravelry page for AU$2 (Click here to buy now).

If you would like to get the PDF for free, I will also send it to you in exchange for pattern testing.

Enter your email address here

And without further ado, the pattern for the Manta Ray.

Materials

• DK or 8ply yarn in two different colours (Main Colour for the back and Contrast Colour for the belly)
• 3.75 (F) crochet hook
• Tapestry needle and scissors
• Polyfill

Optional: 2x 7.5mm safety eyes (not meant for children under 3 y.o.)

Abbreviation used
Ch: chain
Sc: single crochet
St: stitch
*…*: repeat
2sctog: single crochet 2 stitches together (invisible decrease)

All pieces are worked through both loops of the stitches and the body and tail are worked in the round without joining

Body – make 1

In main colour
Round 1. sc 6 in magic ring
Round 2. 2sc in each st around
Round 3. *2sc in the next st, sc
Round 4. *2sc in the next st, sc
Round 5. *2sc in the next st, sc
Round 6. *2sc in the next st, sc
Round 7. *2sc in the next st, sc 5* around
Rounds 8-11. sc in each st around Change to contrast colour
Round 12. sc in each st around
Round 13. *[sc2 tog] twice, sc 3* around
Round 14. sc in each st around
Round 15. *[sc2 tog] twice, sc 1* around
Round 16. sc in each st around
Add safety eyes between round 10 and 11 and stuff the body to desired firmness
Round 17. *sc2 tog, sc 1* around
Round 18. sc2 tog around
Cast off

Tail – make 1

In main colour
Round 1. ch 8, join to rst st with a slip stitch
Rounds 2-4. sc around
Round 5. *sc2 tog, sc* twice, sc2 tog
Rounds 6-9. sc around
Cast off leaving a very long tail
Sew the top of the tail shut and thread the yarn through the tail

Mouth piece – make 1

In main colour
Ch 4
Row 1. sc 3 starting in second chain from hook
Row 2. *ch 3, then sc 2 down the chain starting from the second chain from hook, sc in foundation st* sc 1 in middle sc from previous row, repeat the sequence between **
Cast off

Wings – make 2 in main colour and 2 in contrast colour (4 total)

Ch 2
Row 1. 2sc in second chain from hook, ch 1, turn Row 2. 2sc, sc, ch 1, turn
Row 3. 2sc, sc, 2sc, ch 1, turn
Row 4. 2sc, sc 3, 2sc, ch 1, turn
Rows 5-6. sc across, ch 1, turn
Row 7. 2sc, sc 5, 2sc, ch1, turn
Row 8. sc across, ch1, turn
Row 9. sc across
Cast off leaving a really long tail

Assembly

1. Using a whip stitch, sew the tail to the back of the body and the mouth piece between the two eyes at the front of the body.
2. For the wings, align 1 main colour and 1 contrast colour with the cast off tails together and use a whip stitch to sew them along two sides of the triangle (see picture below). Then, turn them inside out (to put the seam on the inside). Repeat with the second wing, making sure to put the opposite colour on top (contrast colour if you put main colour on top first and vice versa). Sew the wings on both sides of the body, trying to have them as symmetrical as possible.

screen-shot-2017-02-27-at-11-10-51-pm

Note: Do not stuff the tail and the wings.

Let me know if you decide to make this pattern, I’d love to see your finished products!


screen-shot-2017-01-09-at-9-29-20-pm

11 Comments

Filed under Crochet, soft toys