Happy Saturday readers!
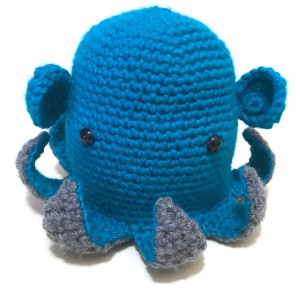
I had planned to have this pattern up earlier than today but I just didn’t have time to finish my test amigurumi until this afternoon! Anyway, better late than never, here is the free pattern for my Dumbo octopus amigurumi.
If you want an easy to read PDF version, I have also put one for sale in my Ravelry store, which you can find here. I would also love to see your creations, so if you make Dumbo or any of my other amigurumi don’t forget to tag me @emmacraftsdesign on Instagram, and #dumbotheoctopus for this little guy!
Materials
• DK or 8ply yarn in two different colours (Main Colour for the body and Contrast Colour for the belly)
• 3.75 (F) crochet hook or appropriate hook for the weight of yarn chosen
• Tapestry needle and scissors
• Polyfill
Optional: 2x 7.5mm safety eyes (not meant for children under 3 y.o.)
Abbreviation used (U.S. terms)
Ch: chain Sc: single crochet St: stitch *…*: repeat sl st: slip stitch
Hdc: half double crochet Dc: double crochet
sc2 tog: single crochet 2 stitches together (invisible decrease)
Body – make 1
In main colour
Round 1. sc 6 in magic ring
Round 2. 2sc in each st around
Round 3. *sc 1, 2sc in the next st* around
Round 4. *sc 2, 2sc in the next st* around
Round 5. *sc 3, 2sc in the next st* around
Round 6. *sc 4, 2sc in the next st* around
Round 7. *sc 5, 2sc in the next st* around
Rounds 8-14. sc in each st around
Round 15. *sc 6, 2sc in the next st* around
Rounds 16-27. sc in each st around
Round 28. *sc 4, sc2tog* around
Place the safety eyes (or embroider them)
now, between rounds 17 and 18
We are now starting the body tentacles (top of the tentacles). The first tentacle will be made in the continuity of the body, without breaking the yarn. For all other tentacles (7 of them) the yarn will be joined to the body in the next st after the previous tentacle, and the tentacles instructions repeated.
Body Tentacles – Make 8
In main colour, continuing from the body
Rows 1-5. sc 5, turn (do not chain when you turn, or your edges will be wonky!)
Row 6. sc 1, sc2tog, sc2, turn
Rows 7-8. sc 4, turn
Row 9. sc 1, sc2tog, sc1, turn
Row 10. sc 1, sc2tog, turn
Row 11. sc2tog, turn
Row 12-13. sc 1, turn
Fasten off. Join your yarn on the body edge, in the next stitch and repeat the instructions until you have 8 tentacles.
Belly – Make 1
In contrast colour
Round 1. sc 8 in magic ring
Round 2. 2sc in each st around
Round 3. *sc 1, 2sc in the next st* around
Round 4. *sc 2, 2sc in the next st* around
Round 5. *sc 3, 2sc in the next st* around
Round 6. *sc 4, 2sc in the next st* around
Round 7. *sc 5, 2sc in the next st* around
We are now starting the belly tentacles (bottom of the tentacles). They will be worked the same way as the body tentacles but joining back to the belly instead.
Belly Tentacles – Make 8
In contrast colour, continuing from the belly
Rows 1-2. sc 7, turn (do not chain when
you turn, or your edges will be wonky!)
Row 3. sc 2, sc2tog, sc 3, turn
Row 4. sc 6, turn
Row 5. sc 2, sc2tog, sc 2, turn
Rows 6-9. sc 5, turn
Row 10. sc 1, sc2tog, sc2, turn
Rows 11-12. sc 4, turn
Row 12. sc 1, sc2tog, sc1, turn
Row 14. sc 1, sc2tog, turn
Row 15. sc2tog, turn
Row 16-17. sc 1, turn
Fasten off. Join your yarn on the belly edge, in the next stitch and repeat the instructions until you have 8 tentacles.
Ears/ fins – Make 2
Round 1. sc 6 in magic ring
Round 2. sc 2, *2 sc in next st* twice, sc 2
Round 3. sl st, sc 1, 2 hdc in next st, *2 dc in next st* twice, 2 hdc in next st, sc 1, sl st
Round 4. sl st, sc 3, *2 sc in next st* 4 times, sc 3, sl st
Fasten off leaving a long tail to sew on the body.
Assembly
1. Sew the ears on the body facing forward, roughly between rounds 13 and 16.
2. Weave in all the yarn tails at the tips of the body and belly tentacles.
3. Stuff the body to desired firmness and sew the belly on using a whip stitch, making sure to align the tips of the tentacles together. Make sure that there is no polyfill in your tentacles or they will be too bulky. Note that the base of the tentacles do not align.
If you have any question about the instructions, you can just leave me a comment 🙂 I hope you guys are having a great weekend!


I do not have any knowledge concerning crochet. But I sure know cute when I see it!
LikeLiked by 1 person
Thanks a lot 😊
LikeLike
So cute!!! Thanks for sharing!
LikeLiked by 1 person
No problem Carrie 🙂 and if you make it I’d love to see pictures 😊
LikeLike
He’s so cute, I hope I have time to try him out soon!
LikeLiked by 1 person
Thank you Kate! 😘 and if you run into any issue let me know I’m happy to help 😊
LikeLiked by 1 person
He’s adorable 😍 I’ve always wanted to try Amigurumi…and he makes my fingers itch 😁
LikeLiked by 1 person
Thank you Tina! The key with amigurumi is to keep your tension very tight, so that the stuffing doesn’t show through 😉
LikeLiked by 1 person
Great tip 😍 I would have messed that one up for sure 😆 Thank you 😘
LikeLiked by 1 person
thanks for sharing Emma ^^
LikeLiked by 1 person
No problem Claire 😘
LikeLike
You dark horse! Love this, just bought it. Will be perfect for gifts on my stall, I will give it ago at some point when my wrist it better! Thanks again ❤
LikeLiked by 1 person
Thank you, you are the best Rebecca! ❤️ it will look so cute on your shop I’m sure 😊 let me know if you have any issue with it at all, I’m always happy to help and send a couple more instructions 😘
LikeLiked by 1 person
Aw thank you so much! Fingers crossed I can make one by the end of the week. Can’t wait 💜
LikeLiked by 1 person
Very cute Emma
LikeLiked by 1 person
Thank you Maura
LikeLiked by 1 person
Reblogged this on Yarnsage.
LikeLike
Pingback: WIP Wednesday – September 27 2017 – Life, Tea, and Everything